


Instruções para o kit de chave de implante universal

Mar
Universal Implant Driver Kit: Complete Instructions & Guide
A Kit de chave de implante universal is a set of specialized tools that allows dentists to work with multiple types of dental implants from different brands. Instead of needing a separate driver for each implant system, this kit includes a variety of driver heads that fit different implant connections (sizes and shapes). This flexibility makes it easier and more efficient for dentists, especially those who use implants from various manufacturers.
Em termos simples, um kit universal de chaves para implantes is like a multi-tool for dental implants. It saves time, space, and money by offering a one-stop solution for implant procedures — making it a convenient choice for dental practices that work with a range of implant systems.
Descrição do produto
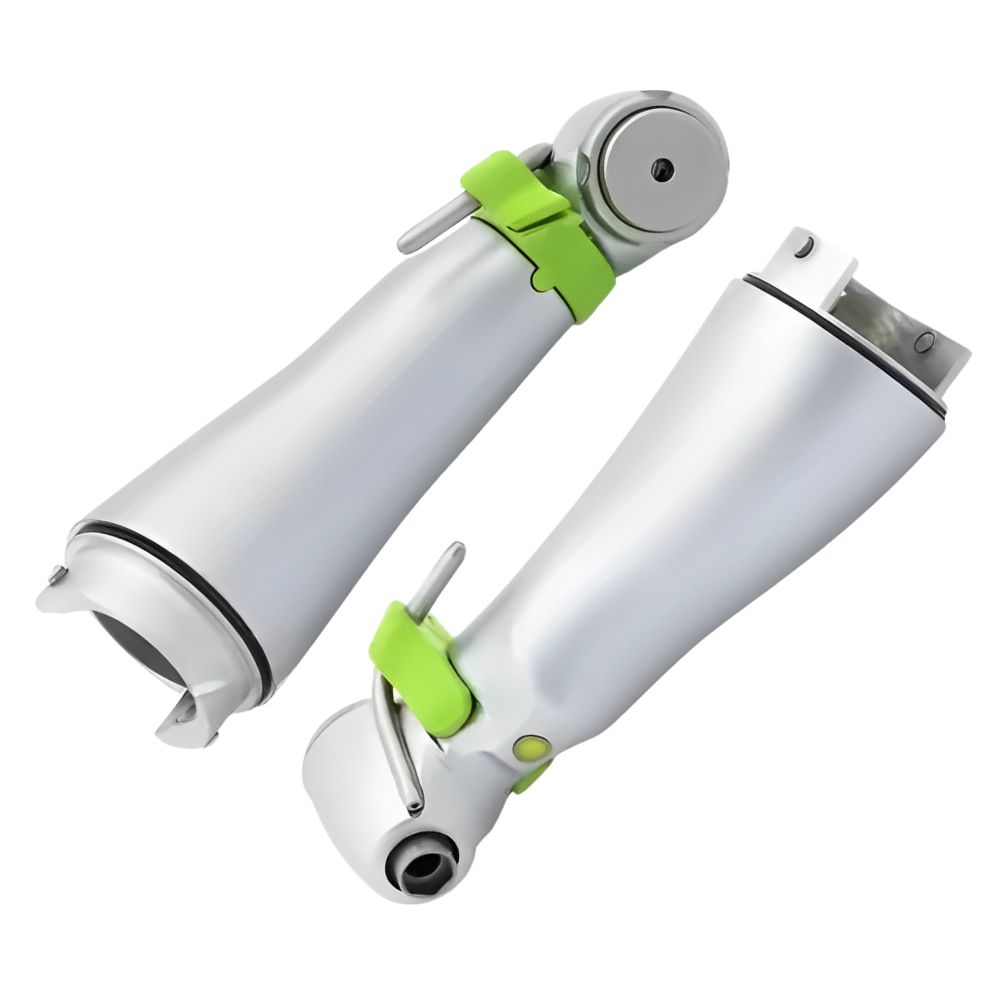
Um chave dinamométrica para implantes is a reusable tool used during the installation of dental implants. It consists of a wrench body and rod composed of stainless steel and titanium alloy materials. The wrench is used throughout the dental implantation process and is supplied non-sterile. Before use, the organization must follow the provided sterilization instructions.
The screwed component consists of a rotating cap and screws made of stainless steel and aluminum alloy materials, also used during the dental implantation process. This is a passive, non-sterile product. Before use, the user’s organization should follow the provided instructions to complete sterilization.
Available models: HYG-DH03, HYG-DH04, HYG01-195, HYG-D11173, HYG-DH174
Intended Use & Scope
Intended Use
After implant placement, the kit is used for the installation of abutments, crowns, impression taking, and other restoration procedures.
Scope of Use
Suitable for use in dental implant surgery, restoration procedures, and during the preparation of dental crowns by dental technicians.
How to Use the Universal Implant Driver Kit
Step-by-Step Usage Instructions
When tightening with the torque wrench, insert the corresponding screwdriver (or component) vertically into the wrench hole. Once you hear a click, the component is properly installed.
- Ensure the arrow points clockwise. Use the torque value specified in the relevant product’s instruction manual to tighten the assembly. If you need to reverse, switch the direction indicator to reverse mode (see diagrams a, b, and c — Figure C shows reverse mode).
- To unscrew the assembly, manually apply pressure to lever arm C.
For a comprehensive set with adjustable torque settings, see our Implant Driver Kit with Adjustable Torque Wrench.
Torque Specifications by Implant Brand
The following table provides recommended torque values for common implant brands compatible with this kit. Always refer to the individual implant manufacturer’s instructions for final verification.
| Tipo de ligação | Compatible Brands | Abutment Torque (Ncm) | Implant Placement Torque (Ncm) |
|---|---|---|---|
| Hex 0.9 | Xive | 25–35 Ncm | Up to 50 Ncm |
| Hex 1.0 | Anquilos | 15–25 Ncm | Up to 50 Ncm |
| Hex 1.2 | Osstem, DIO, 3I, C-Tech, ICM, Megagen, T-plus | 30–35 Ncm | Up to 50 Ncm |
| Hex 1.25 | Cortex, Ticare, ABT, Zimmer | 25–35 Ncm | Up to 45 Ncm |
| Hex 1.27 | Dentium, Dentis, Bego, Astra, Adin, MIS, Alpha, Biotec, Biohorizon | 25–35 Ncm | Up to 50 Ncm |
| Hex 1.4 | ICX | 20–30 Ncm | Up to 45 Ncm |
| NOB | Nobel, Basic, Omni-Tight, Dental Master | 32–35 Ncm | Up to 50 Ncm |
| ITI | Straumann, Trausim, Bioconcept | 35 Ncm | Up to 50 Ncm |
Note: Torque values are general guidelines. Always consult your implant manufacturer’s official instructions for the precise torque values applicable to your specific implant system and component.
Precautions and Warnings
- All dental implant tools must be cleaned and sterilized before use.
- Chemical reagents used for reprocessing dental implant tools must not be strongly corrosive — avoid strong acids or strong alkaline solutions.
- When dental implant tools show significant damage or wear, they must be replaced with new ones.
Sterilization Method
- Place the torque wrench and screw into an undamaged sterilization bag.
- Perform high-temperature, high-pressure sterilization at 136°C ±2°C, or follow local regulatory requirements.
- After sterilization, remove the instrument from the sterilizer and allow it to dry naturally. Ensure the tool is completely dry before storage or use.
Storage Requirements
Implant tools should be stored in a clean, dry, well-ventilated environment with the following conditions:
- Relative humidity: 10% to 93%
- Temperature: -20°C to +55°C (indoor environment)
- Atmosphere: Free from corrosive gases
Validity Period & Target Audience
Validity Period
The service life of this kit is 5 years from the date of manufacture, provided the tools are properly maintained and stored according to the guidelines above.
Target Audience
For use by qualified dental professionals treating both adult and pediatric dental patients.
Especificações
Available specifications include (25mm and 20mm lengths):
HYG-DH03-L1 (25mm), HYG-DH03-L2 (25mm), HYG-DH03-L3 (25mm), HYG-DH03-L4 (25mm), HYG-DH03-L5 (25mm), HYG-DH03-L6 (25mm), HYG-DH03-L7 (25mm), HYG-DH03-L8 (25mm), HYG-DH03-51 (20mm), HYG-DH03-52 (20mm), HYG-DH03-53 (20mm), HYG-DH03-54 (20mm), HYG-DH03-55 (20mm), HYG-DH03-56 (20mm), HYG-DH03-57 (20mm), HYG-DH03-58 (20mm), HYG-DH04-L1 (25mm), HYG-DH04-L2 (25mm), HYG-DH04-L3 (25mm), HYG-DH04-L4 (25mm), HYG-DH04-L5 (25mm), HYG-DH04-L6 (25mm), HYG-DH04-L7 (25mm), HYG-DH04-L8 (25mm), HYG-DH04-51 (20mm), HYG-DH04-52 (20mm), HYG-DH04-53 (20mm), HYG-DH04-54 (20mm), HYG-DH04-55 (20mm), HYG-DH04-56 (20mm), HYG-DH04-57 (20mm), HYG-DH04-58 (20mm), HYG-DH83, HYG-DH84, HYG-DH85, HYG-DH86, HYG-DH87, HYG-DH88, HYG-DH89, HYG-DH90, HYG-DH173-L1 (25mm), HYG-DH173-L2 (25mm), HYG-DH173-L3 (25mm), HYG-DH173-L4 (25mm), HYG-DH173-L5 (25mm), HYG-DH173-L6 (25mm), HYG-DH173-L7 (25mm), HYG-DH173-L8 (25mm), HYG-DH173-51 (20mm), HYG-DH173-52 (20mm), HYG-DH173-53 (20mm), HYG-DH173-54 (20mm), HYG-DH173-55 (20mm), HYG-DH173-56 (20mm), HYG-DH173-57 (20mm), HYG-DH173-58 (20mm), HYG-DH174-L1 (25mm), HYG-DH174-L2 (25mm), HYG-DH174-L3 (25mm), HYG-DH174-L4 (25mm), HYG-DH174-L5 (25mm), HYG-DH174-L6 (25mm), HYG-DH174-51 (20mm), HYG-DH174-52 (20mm), HYG-DH174-53 (20mm), HYG-DH174-54 (20mm), HYG-DH174-55 (20mm), HYG-DH174-56 (20mm)
Compatible Implant Brands
| Tipo de ligação | Compatible Brand(s) |
|---|---|
| Hex 0.9 | Xive |
| Hex 1.0 | Anquilos |
| Hex 1.2 | Osstem, DIO, 3I, C-Tech, ICM, Megagen, T-plus |
| Hex 1.25 | Cortex, Ticare, ABT, Zimmer |
| Hex 1.27 | Dentium, Dentis, Bego, Astra, Adin, MIS, Alpha, Biotec, Biohorizon |
| Hex 1.4 | ICX |
| NOB | Nobel, Basic, Omni-Tight, Dental Master |
| ITI | Straumann, Trausim, Bioconcept |
Perguntas frequentes (FAQ)
Para que serve um kit de chaves de implante universal?
A universal implant driver kit is used by dental professionals during implant procedures to tighten abutments, crowns, and other prosthetic components onto implants. The “universal” design means a single kit contains driver heads compatible with multiple implant brands, eliminating the need to purchase brand-specific tools for every system you work with.
What implant brands are compatible with this kit?
This kit is compatible with a wide range of leading implant brands, including Straumann (ITI), Nobel (NOB), Osstem, Zimmer, Astra, Dentium, Biohorizon, MIS, Megagen, 3I, Ankylos, Xive, and many more. See the full compatibility table above for a complete list organized by hex connection size.
What torque should I use when tightening implant components?
Torque values vary by implant brand and component type. As a general guide, abutment screws are typically tightened to 25–35 Ncm, while implant placement torque can reach up to 50 Ncm depending on the system. Always refer to your specific implant manufacturer’s instructions for the exact torque specification for your case. See our Implant Driver Kit with Adjustable Torque Wrench for precise torque control.
How do I sterilize the implant driver kit?
Place the tools in an undamaged sterilization bag and autoclave at 136°C ±2°C using a standard high-temperature, high-pressure steam sterilization cycle. After sterilization, allow the instruments to air dry completely before storage or use. Avoid strong acid or alkaline cleaning agents during reprocessing.
How long does the universal implant driver kit last?
The kit has a validated service life of 5 years, provided it is properly cleaned, sterilized, and stored in a dry, clean environment between -20°C and +55°C. Replace individual components if you notice significant wear or damage.
What is the difference between the universal kit and the adjustable torque wrench kit?
O Kit de chave de implante universal provides a broad set of driver heads for maximum brand compatibility. The Implant Driver Kit with Adjustable Torque Wrench adds the ability to pre-set and precisely control the torque applied during tightening — ideal when strict torque adherence is required by the implant system protocol.
Can this kit be used for both placement and restoration?
Yes. This kit is designed for use throughout the implant workflow — including implant placement, abutment connection, crown installation, and impression taking. It is also suitable for use by dental technicians during crown preparation.
Purchase the Universal Implant Driver Kit
Ready to streamline your implant workflow? Browse our full range:
- Kit de chave de implante universal — Compatible with 8+ connection types across all major implant brands
- Implant Driver Kit with Adjustable Torque Wrench — Full compatibility plus precise torque control


Ferramentas de reparação de contra-ângulos
Chave de Torque Universal para Implantes / Kit de Chaves Protéticas – 10-70 Ncm
